

Roasted split chicken breast is one of the easiest ways to prepare a delicious, satisfying chicken dinner at home. With bone-in chicken, crisp golden skin, and tender meat, this simple oven recipe delivers plenty of flavor without complicated cooking techniques. You only need a few everyday ingredients, the right oven temperature, and a little attention to detail.
This oven-roasted chicken breast recipe uses high heat to brown the skin while keeping the meat juicy. A little butter, oil, salt, pepper, and optional herbs create a flavorful finish. Whether you are cooking a weeknight dinner, preparing a family meal, or serving guests, this method helps you make dependable roasted chicken with confidence.
Why You’ll Love This Roasted Split Chicken Breast Recipe
A good roasted split chicken breast has everything you want from a homemade chicken dinner: crisp skin, tender meat, and rich, savory flavor. Leaving the bone in helps protect the meat during roasting, while the skin adds flavor and helps reduce moisture loss at the surface. High-temperature roasting also creates a beautifully browned exterior without requiring hours in the oven.
This recipe is especially useful when you want an easy meal that feels special. You can season the chicken with basic pantry ingredients or add garlic, parsley, rosemary, thyme, and other herbs and spices. Serve it with roasted vegetables, mashed potatoes, rice, or a fresh salad for a balanced meal. It is an easy roasted chicken breast recipe that works for both everyday dinners and relaxed weekend cooking
What Makes This Roasted Split Chicken Breast So Flavorful?
The secret lies in three things: dry skin, well-balanced seasoning, and careful temperature control. Patting the chicken dry helps the surface brown instead of steaming. Butter tucked beneath the skin adds a rich buttery flavor, while a light coating of oil encourages the skin to become crisp and golden. Salt also helps season the meat and improve the skin’s texture when used properly.
The bone contributes to the shape and structure of the breast, helping it cook more evenly around the thicker meat. However, bone-in chicken can still dry out if you leave it in the oven too long. A reliable instant-read thermometer is therefore more useful than judging doneness by color alone. Once the thickest part reaches a safe internal temperature, you can rest the chicken and enjoy a flavorful, tender result.
What Is a Split Chicken Breast?
A split chicken breast is one half of a whole chicken breast section, usually sold with the bone and skin attached. It is also called a bone-in skin-on chicken breast. The cut includes the breast meat, a portion of the breastbone or rib bones, and a layer of skin over the meat. Butchers may sell individual split breasts or larger packs containing several pieces.
This cut differs from boneless, skinless chicken breast in both structure and cooking behavior. The bone adds support, and the skin protects the surface while roasting. These features make it well suited to a baked bone-in chicken breast recipe, especially when you want a browned exterior and moist meat. Split breasts are often larger than boneless portions, so cooking time depends on their thickness and weight rather than the name of the cut alone.
Split Chicken Breast vs. Boneless Chicken Breast
Boneless chicken breasts are convenient because they cook quickly and are easy to slice. However, they can become dry when exposed to heat for too long, particularly if they are thin or uneven in thickness. Split breasts take longer to cook, but their skin and bones provide extra protection and help produce a more substantial roasted flavor.
Neither cut is automatically better for every meal. Choose boneless chicken when you need a quick ingredient for salads, sandwiches, or stir-fries. Choose split chicken breast when you want a traditional roast with crisp skin and a satisfying presentation. For this recipe, look for pieces that are similar in size so they finish cooking at roughly the same time.
How to Choose Good Bone-In Chicken Breast
Choose chicken breasts with intact skin, a fresh appearance, and no unpleasant odor. If possible, select pieces with similar thickness because evenly sized portions are easier to roast together. The skin should cover most of the meat rather than being torn or removed, since the skin plays an important role in achieving a chicken breast with crispy skin.
Fresh and frozen chicken can both work well. If you buy frozen chicken, thaw it safely in the refrigerator before cooking. Avoid thawing raw chicken on the kitchen counter, where the outer surface can warm into a temperature range that encourages bacterial growth. Before seasoning, remove any packaging and pat the chicken dry with paper towels.
Ingredients for Roasted Split Chicken Breast
You do not need a long shopping list to make flavorful roasted chicken. The basic ingredients are bone-in chicken breasts, unsalted butter, vegetable oil or olive oil, salt, and black pepper. Garlic and fresh herbs are optional, but they add extra depth without hiding the natural flavor of the meat. These ingredients create a simple foundation for homemade roasted chicken that tastes delicious with many side dishes.
For the best result, measure the seasoning according to the amount and size of your chicken. Larger breasts need more seasoning than smaller pieces, although you should avoid piling too much salt onto the skin. The butter adds richness, while oil helps the skin brown under high heat. Together, they make a roasted chicken breast with butter that feels satisfying without requiring a complicated sauce. Ml pMain Ingredients and Their Purpose

Roasted Split Chicken Breast
Ingredients
Split chicken breasts, bone-in and skin-on 2 large pieces, about 2–3 lb total Provides the main protein and a generous serving
Unsalted butter, softened 2 tablespoons Adds richness and helps flavor the meat beneath the skin
Vegetable oil or olive oil 1 tablespoon Helps the skin brown and crisp
Kosher salt About 1 teaspoon, adjusted to taste Seasons the chicken and enhances its natural flavor
Black pepper ½ teaspoon, or to taste Adds gentle heat and savory depth
Minced garlic 1–2 cloves, optional Gives the butter a fragrant, savory flavor
Fresh parsley, chopped 1 tablespoon, optional Adds freshness and color
Fresh thyme or rosemary 1 teaspoon chopped, optional Brings an earthy, aromatic note
Instructions
- Step 1: Prepare the Chicken and Preheat the Oven Remove the chicken from its packaging and pat every surface dry with paper towels. Drying is important because moisture on the skin must evaporate before browning can develop properly. Trim loose pieces of fat or damaged skin if necessary, but leave most of the skin attached. Wash your hands and clean any surfaces that come into contact with raw poultry. Preheat oven to 450°F (230°C) and position a rack in the center. Prepare a rimmed baking sheet with a wire rack, if available. Starting with a fully heated oven helps the skin begin browning promptly and supports a high-temperature roasted chicken method. You do not need to rinse raw chicken; rinsing can spread contaminated droplets around your sink and kitchen.
- Step 2: Season the Chicken and Add Butter Under the Skin In a small bowl, combine softened unsalted butter with salt, black pepper, and minced garlic or chopped herbs if desired. Use your fingers to gently separate the skin from the meat, working from the wider opening toward the center. Spread the butter mixture underneath the skin in a thin, even layer. Avoid forcing your fingers too far, as torn skin can expose the meat and reduce the protective layer.Season the outside of the chicken with salt and pepper. Brush or rub a small amount of oil over the skin, making sure the surface receives a light, even coating. This technique produces a roasted split chicken breast with rich flavor beneath the skin and a nicely browned exterior. Keep the seasoning balanced, especially if your butter or spice blend already contains salt.
- Step 3: Arrange the Chicken for Even Roasting Place the breasts skin-side up on the prepared rack, leaving space between them. Crowding the pan can trap steam and slow browning, particularly when you roast several pieces at once. If the chicken breasts are very large, use a second pan rather than stacking or squeezing them together. The hot air needs room to move around each piece. Position thicker ends toward the hotter part of your oven only if you know your oven has uneven heating. Most home cooks can simply place the pan on the center rack and rotate it once if browning looks uneven. Avoid opening the oven repeatedly because each opening releases heat. Let the oven-baked split chicken breast roast undisturbed until it approaches the expected cooking time.
- Step 4: Roast Until Golden Brown and Fully Cooked Roast the chicken for approximately 30–45 minutes, depending on the size and thickness of the breasts. Smaller pieces may finish sooner, while very large portions may need additional time. Begin checking the internal temperature around the 25–30-minute mark rather than relying entirely on a timer. The goal is a deeply golden surface and safe doneness, not a particular number of minutes. Insert an instant-read thermometer into the thickest part of the breast without touching the bone. The chicken is ready when the temperature reaches 165°F (74°C). If the skin becomes dark before the center is cooked, loosely shield the browned areas with foil and continue roasting. Do not serve chicken based only on clear juices or skin color; a thermometer provides a more dependable safety check.
- Step 5: Rest the Chicken Before Serving Transfer the cooked chicken to a clean plate or cutting board and let it rest for about five minutes before slicing. Resting gives the meat time to settle after cooking and makes it easier to carve neatly. A brief rest also reduces the amount of juice that escapes immediately when you cut into the breast. Do not cover the chicken tightly with foil if keeping the skin crisp is your priority. Trapped steam can soften the surface you worked to brown. Once rested, cut along the breastbone and rib bones, then slice the meat across the grain where practical. Serve the chicken while it is warm, with any juices collected on the plate spooned over the meat.
Essential Equipment for Roasting Split Chicken Breast
The right equipment makes roasting easier and more predictable. You need an oven, a rimmed baking sheet or roasting pan, and preferably a wire rack that fits inside the pan. The rack lifts the chicken above the pan’s surface, allowing hot air to circulate around the pieces. This improves even heat distribution and reduces the chance of the underside becoming soggy from accumulated juices.
A reliable instant-read thermometer is the most important tool for checking doneness. Chicken can look browned before the center is fully cooked, and the meat may appear pale even after reaching a safe temperature. A thermometer removes much of this guesswork. Paper towels, tongs, a small mixing bowl, and a spoon or pastry brush will also help you prepare and handle the chicken neatly.
How to Roast Split Chicken Breast in the Oven
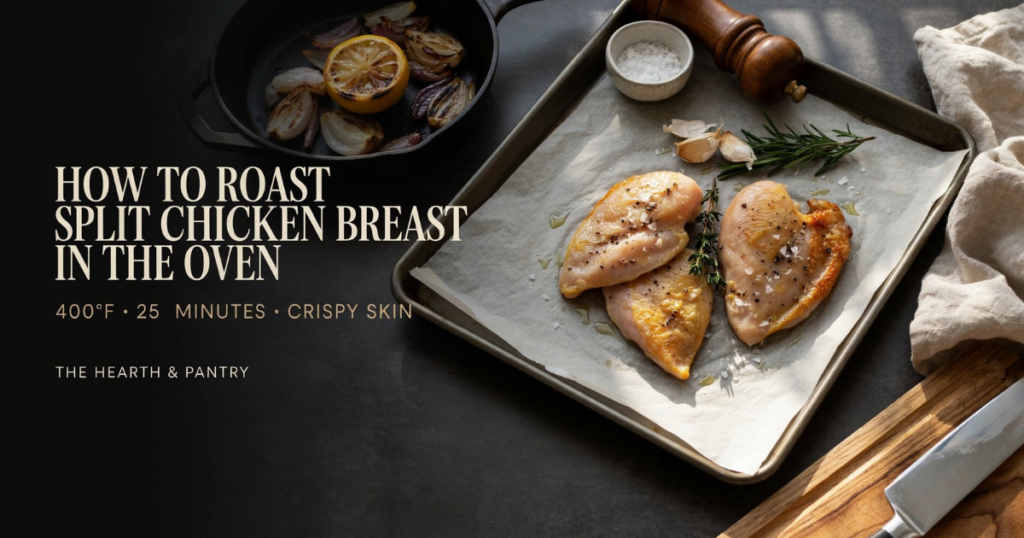
Roasting split chicken breast is straightforward when you prepare the meat carefully and check its temperature near the end. Begin by heating the oven to 450°F (230°C), then pat the chicken completely dry. Mix the softened butter with salt, pepper, and any optional garlic or herbs. Carefully loosen the skin and spread some of the butter mixture underneath it without tearing the skin.
Arrange the breasts skin-side up on a rack over a rimmed baking sheet. Lightly coat the skin with oil, then season it with a little more salt and pepper if needed. Roast the chicken until the skin is deeply golden and the thickest part reaches 165°F (74°C). Remove it from the oven and rest chicken before slicing so the juices can settle and the meat remains pleasant to eat.
Roasted Split Chicken Breast Cooking Time and Temperature
Temperature matters just as much as cooking time when you want tender, flavorful chicken. Roasting at 450°F (230°C) encourages the skin to brown while the interior cooks relatively quickly. However, breast size, starting temperature, oven accuracy, and pan design all affect how long the chicken needs. Use the estimated times as a guide, then confirm doneness with a thermometer.
For many medium-to-large split breasts, cooking may take around 30–45 minutes at 450°F. Smaller pieces may finish earlier, while exceptionally thick breasts can take longer. The safe target is 165°F (74°C) in the thickest part of the meat. If you are cooking several pieces, check each breast separately because they may not reach the target temperature simultaneously.
How Long to Roast Split Chicken Breast at 450°F?
At 450°F, split chicken breasts often need approximately 30–45 minutes, although the exact timing depends on their size and thickness. A recipe estimate of 30–35 minutes may suit medium-sized portions, but larger breasts can require more time. Start checking early to prevent overcooking, especially if your chicken pieces are relatively small.
FAQs
1. How long should I roast split chicken breasts?
Roast split chicken breasts at 450°F (230°C) for about 30–45 minutes, depending on their size and thickness. Always check the thickest part with a meat thermometer. The chicken is ready when it reaches 165°F (74°C).
2. What are split chicken breasts?
Split chicken breasts are half of a whole chicken breast section, usually sold with the bone and skin attached. They offer rich flavor, tender meat, and delicious crispy skin when roasted properly.
3.What is the difference between a whole chicken breast and a split chicken breast?
A whole chicken breast refers to both breast halves together, while a split chicken breast is one half of that section. Split breasts typically include the bone and skin, making them ideal for roasting.
4. Is it better to bake bone-in chicken breast at 350 or 400?
Both temperatures work well, but 400°F (205°C) usually cooks chicken faster and encourages better browning. At either temperature, cook until the thickest part reaches 165°F (74°C) for food safety.
5.What is the best way to cook chicken breast to keep it moist?
Pat the chicken dry, season it well, and avoid overcooking it. Adding butter beneath the skin helps enhance flavor, while a meat thermometer prevents guesswork. Let the chicken rest for about five minutes before slicing.
Conclusion
Conclusion
Roasted Split Chicken Breast is a simple, delicious way to enjoy tender chicken with crispy, golden skin. With a few basic ingredients, the right oven temperature, and careful cooking, you can prepare a flavorful meal your whole family will love. Remember to pat the chicken dry, season it well, and use a meat thermometer to ensure it reaches 165°F (74°C).
Let it rest for five minutes before serving to help keep the meat juicy. Pair your homemade roasted chicken breast with roasted vegetables, mashed potatoes, or a fresh salad for a satisfying dinner. Try this easy recipe today and enjoy perfectly roasted chicken at home!

2 Replies to “Roasted Split Chicken Breast”